Last week, I described the basics of GraphQL in this post. We covered the basics of GraphQL and the fundamental concepts that go into setting up and using GraphQL. This week, I am covering the critical piece that I left out last week: GraphQL mutations.
GraphQL mutations allow developers to modify the data stored on the server.
GraphQL doesn't know what to do with any data you send to it by itself, so we have to tell it specifically what to do in each mutation we create.
Creating Mutations
The GraphQL gem has a handy generator which we can use to get started building our mutations. Navigate to the project directory and run the following commands:
rails g graphql:mutation create_topic
rails g graphql:mutation create_reply
rails g graphql:mutation create_like
Each of these commands creates a new named mutation. The only argument the generator requires is the name of the mutation.
Add the following code to app/graphql/mutations/create_topic.rb:
moduleMutationsclassCreateTopic<BaseMutation# just like queries, mutations return certain fields# in this case, the mutation returns a list of strings which are potential errors# and the topic that was created if the creation was successfulfield:errors,[String],null: falsefield:topic,Types::TopicType,null: true# mutations also take arguments, very similar to the way queries can take argumentsargument:user_id,ID,required: trueargument:title,String,required: trueargument:content,String,required: true# Unlike queries, mutations must have a resolve method to tell# GraphQL what to do with the mutation and the arguments it receives.defresolve(title:,content:,user_id:)# In this case, we will create a new topic.topic=Topic.new(title: title,content: content,user_id: user_id)iftopic.save{topic: topic,errors: []}else{topic: nil,errors: topic.errors.full_messages}endendendend
Fields, arguments, and the resolve method make up the majority of GraphQL mutations.
GraphQL does not know how to handle the polymorphic association on its own, we'll have add some code specifically to address those:
moduleMutationsclassCreateReply<BaseMutation# As with create_topic, we have fields, arguments and a resolve methodfield:errors,[String],null: falsefield:reply,Types::ReplyType,null: false# We need to give the pieces of the polymorphic info that it needs to# properly construct the associationargument:post_id,ID,required: true# post_type tells Rails what kind of model to look for.argument:post_type,String,required: trueargument:user_id,ID,required: trueargument:content,String,required: truedefresolve(post_id:,user_id:,content:,post_type:)# Use the Rails method `constantize` to turn a string into a constant# which we know should refer to an ActiveRecord model, allowing us to run# the ActiveRecord method `find_by` to get the correct object with that typetype=post_type.constantizepost=type.find_by(id: post_id)reply=Reply.new(content: content,user_id: user_id,post: post)ifreply.save{reply: reply,errors: []}else{reply: nil,errors: reply.errors.full_messages}endendendend
Now try to implement a create_like mutation on your own. If you get stuck, you can always check out the source code for the project here.
Miniforum is a tiny forum app built for a series of blogs
Creating Users and Login Sessions
We need to make user creation separate from GraphQL so that we can easily require all users to be logged in before accessing the GraphQL endpoint.
As a result, we'll need to generate a controller dedicated to user creation:
rails g controller users create
Open up the new controller and add the following:
# app/controllers/users_controller.rbclassUsersController<ApplicationControllerdefcreateuser=User.new(user_params)ifuser.saverenderjson: user_json(user)elserenderjson: {message: 'Failed to create user',errors: user.errors.full_messages}endendprivate# Use strong parameters to prevent any unwanted parameters from getting through.# The password confirmation field is required to allow BCrypt to properly hash the password.defuser_paramsparams.require(:user).permit(:name,:username,:email,:password,:password_confirmation)end# Turns a user model object into a hash which can be converted to json. Maybe# not necessary in a controller this small, but certainly necessary in a larger project.defuser_json(user)user.as_json(only: [:id,:name,:username,:email])endend
Authenticating Users
Since we're using JWT to handle user sessions, we'll need to add another controller to allow users to create those sessions by logging in.
Create a new controller to handle login sessions and add the following code:
rails g controller sessions create
Now edit the new controller:
# app/controllers/sessions_controller.rbclassSessionsController<ApplicationControllerdefcreate# find the user by the username included in the parametersuser=User.find_by(username: session_params[:username])# If the user exists, and can be authenticated with the given password, generate a token # for the session and return it.ifuser&&user.authenticate(session_params[:password])# Generate the token based on the user’s id. Use the value of JWT_SECRET in # the `.env` file.token=JWT.encode({user_id: user.id},ENV['JWT_SECRET'])renderjson: {token: token,user_id: user.id}elserenderjson: {message: "Incorrect username or password"}endendprivate# Use strong parameters to make sure we only get a username and password.defsession_paramsparams.require(:session).permit(:username,:password)endend
In order to use the JWT_SECRET variable, we need to create a .env file in the root project directory.
To keep the JWT_SECRET secure, be sure to add .env to the project’s .gitignore file. Make sure that .env is never committed into a repository that is publicly accessible.
Once .env is created, run the following command:
rake secret
Paste the output of that command into a variable in .env:
JWT_SECRET=<rake output>
Doing this will ensure that you have a cryptographically secure number to use for encoding the user’s session data.
We need to add a current_user method to ApplicationController so that the back end can check whether a user is authenticated.
# app/controllers/application_controller.rb# This error is used below to specify that a session is not authenticatedclassAuthenticationError<StandardErrorendclassApplicationController<ActionController::APIdefcurrent_user# Authentication setting the `Access-Token` header to the result of # the create session routetoken=request.headers['Access-Token']raiseAuthenticationErroriftoken.nil?# Decodes the JWT token and returns only the user id from it.user_id=JWT.decode(token,ENV['JWT_SECRET'])[0]['user_id']@user=User.find_by(id: user_id)endend
Finally, make current_user the first method invocation in the execute route of the GraphQL controller.
With that done, we are ready to test our mutations.
Testing GraphQL Mutations with Postman
To test our graphql mutations, we’ll need to have a user in our database. You can use the rails console to create a user directly or you can send a post request to the users_controller using Postman.
Once you’ve created a user, we have to get the access token. Start up the rails development server and send a post request to the /sessions endpoint of the back end with the username and password you want to log in to. If everything is set up correctly, then you should receive a json response with the token in it. Paste the new token as the Access-Token header into the Postman request.
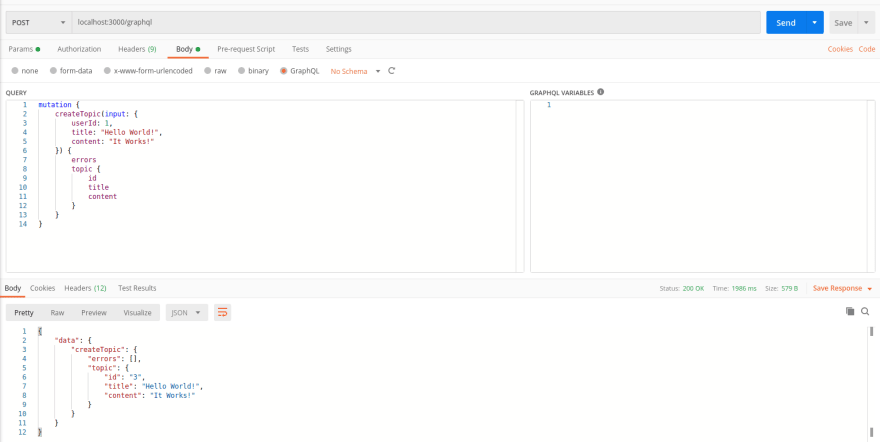
Now we can submit GraphQL queries again. Let’s create a new topic:
As you can see, to run a mutation we have to use the mutation keyword along with the name of the mutation and a json object containing all the required arguments.
You can also use a json object to hold all the GraphQL variables, but for a single query like the one above, putting them in the query string is a little easier.
Our backend should be nominally complete now. We can log in and run queries and create objects. We haven’t implemented updating objects or deleting them yet. Try to create update and delete mutations on your own.
Thank you for reading! As always the final code is available here. If you have any questions, don’t hesitate to ask them in the comments section.